

Keying data in NoSQL
March 11, 2021
Browser Tab-Nabbing Security
April 7, 2021
Configuring debuggers to work with Vue + TypeScript is not easy.
Unfortunately, at the time of this writing, information about this topic is minimal on developer QA sites, and the tools that should handle this setup for you automatically don’t play very well together.
Hopefully, in the future Vue + Typescript will work properly with debuggers right out of the box, but until then, we’ll have to settle for configuring the tools ourselves.
Let’s jump right in!
Overview
- Workspace/Tools
- Create a Project
- Configure Vue/Webpack
- Source Maps
- Source Maps V3
- Working with JavaScript
- Configure VS Code
- The First Breakpoint
- Switching to TypeScript
- Correct the <script> Source Maps
- Closing Remarks
Workspace/Tools
I’ll be using these applications and tools throughout this tutorial:
- VS Code
- Google Chrome
- Vue 3
Create a Project
If you do not have an existing project, I would recommend that you use the Vue CLI to create one (just be sure that it includes TypeScript).
For those of you who are not sure how to create a new project with the Vue CLI, I’ll refer you to the official documentation.
Here are the versions of all the packages that make up my project:
{
  "dependencies": {
    "core-js": "^3.6.5",
    "vue": "^3.0.0"
  },
  "devDependencies": {
    "@vue/cli-plugin-babel": "5.0.0-rc.2",
    "@vue/cli-plugin-typescript": "5.0.0-rc.2",
    "@vue/cli-service": "5.0.0-rc.2",
    "@vue/compiler-sfc": "3.2.30",
    "source-map": "0.7.3",
    "typescript": "4.5.5"
  }
}Note: There are some differences between Vue CLI v4 and v5 that I will point out in this post. You can determine which version of the Vue CLI you’re using by checking which version of the “@vue/cli-service” package is in your package.json file.
Configure Vue/Webpack
Under the hood, Vue uses Webpack for building/bundling application resources. By default, it will not generate output that is compatible with debuggers; You must configure it to do so.
If you don’t already have one, create a file named vue.config.js in the root directory (on the same level as your package.json file) of your project:

The default export of this file should be an object that contains a configureWebpack function. This function should return an object which will contain our Webpack configuration:
module.exports = {
  configureWebpack() {
    return {

    };
  }
};
In order to get Webpack to create output that can be used with a debugger, we must set an option called devtool. There are multiple configurations that can be used for this option, but for now, we will use “source-map”:
configureWebpack() {
  return {
    devtool: 'source-map'
  };
}
To test that Webpack is building your project properly, you should now start your app and open it on Chrome. Open Chrome’s developer tools, and navigate to the Sources tab.
If the configuration is correct, the Page menu should contain this hierarchy:
top
  webpack://
    .
      src
For Vue CLI v5 the structure is a bit different. It seems to organize the source files in the following structure:
top
  <name-from-package.json>
    .
      src
The value of “<name-from-package.json>” would be the “name” field from your package.json file. In my case it was “vue-typescript-debugger”, so the structure would be:
top
  vue-typescript-debugger
    .
      src
You may notice that the directory structure within the src folder mirrors that of your project’s directory structure (with a few oddities that you can ignore for the moment):


If you open these files, you will notice that some of them contain your project’s source code (App.vue for example):
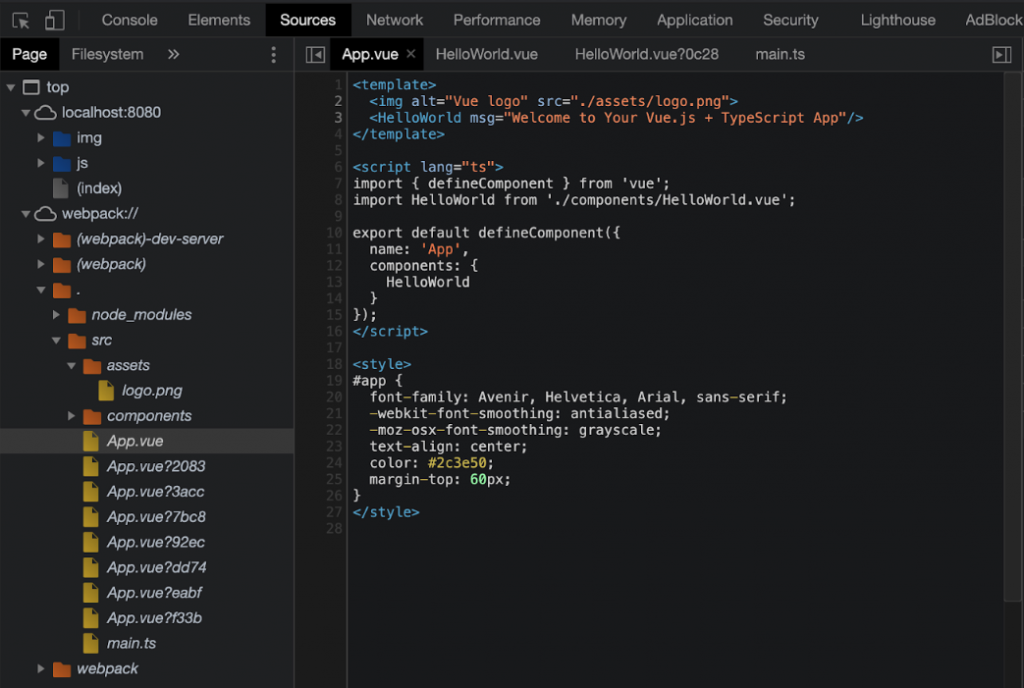

Don’t worry if the file names in your project look slightly different from the ones in mine.
Source Maps
In order to fully understand the concepts and code in the rest of this article, you need to have at least a basic grasp of Source Maps.
When bundlers, such as Webpack (which is what Vue uses), build your code, they put it through a process called uglification.
In short, this process reduces the final bundle’s file size (by reducing variable names down to 1 letter, among many other things), but it makes most of the final output completely unreadable to humans. For example: here is what the uglification process did to my project (quite nasty, isn’t it?):

Herein lies our problem: how could we ever tell where our original source code went in all this mess? Even more important, try going the other way: pick any single expression within this massive glob of code, and then attempt to find out which portion of the source code it originally came from.
Attempting to do this ranges from being incredibly difficult to impossible.
This is where Source Maps come in. Indeed, the name itself gives away what a Source Map does: it maps every segment of bundled (i.e. uglified) code back to the Source files, lines, and columns that they originally came from.
Source Maps V3
The specification (format) of Source Maps has gone through multiple versions since its inception, and it currently rests at Version 3. Here is an example of the structure of a V3 Source Map:
// Note: Source Maps are stored as raw JSON at the end of the build process, so
// comments are not allowed.  These are added here just for the sake of explanation
{
  // The version of the Source Map specification that this Source Map adheres to
  version: 3,

  // A list of paths to all files that contributed to this Source Map
  sources: [
    '/Users/sethfearnside/Desktop/vue-typescript-debugger/src/App.vue'
  ],

  // This odd looking string is a collection of all the individual line-to-line
  // and column-to-column mappings that make up this Source Map.  The mappings
  // look so unusual because they are encoded/compressed. I will touch on these
  // individual mappings later in this tutorial
  mappings: ';OACsB,U,MAAuB,mB;;8BAA3C,YAAA,CAA4C,KAA5C,EAA4C;AAAvC,EAAA,GAAG,EAAC,UAAmC;AAAxB,EAAA,GAAuB,EAAvB;AAAwB,CAA5C,E,IAAA,E,EAAA,C;;;;;sDAAA,U,EACA,YAAA,CAA2D,qBAA3D,EAA2D;AAA/C,IAAA,GAAG,EAAC;AAA2C,GAA3D,C',

  // An array of the original source-file content of each of the files that are
  // present in the “sources” list.  You will notice that the one and only
  // entry in this array is the source code from the App.vue file. If you would
  // like to confirm this, open your Chrome’s console (within the developer tools)
  // and log this entire value out
  sourcesContent: [
      '<template>\n' +
      '  <img alt="Vue logo" src="./assets/logo.png">\n' +
      '  <HelloWorld msg="Welcome to Your Vue.js + TypeScript App"/>\n' +
      '</template>\n' +
      '\n' +
      '<script lang="ts">\n' +
      "import { defineComponent } from 'vue';\n" +
      "import HelloWorld from './components/HelloWorld.vue';\n" +
      '\n' +
      'export default defineComponent({\n' +
      "  name: 'App',\n" +
      '  components: {\n' +
      '    HelloWorld\n' +
      '  }\n' +
      '});\n' +
      '</script>\n' +
      '\n' +
      '<style>\n' +
      '#app {\n' +
      '  font-family: Avenir, Helvetica, Arial, sans-serif;\n' +
      '  -webkit-font-smoothing: antialiased;\n' +
      '  -moz-osx-font-smoothing: grayscale;\n' +
      '  text-align: center;\n' +
      '  color: #2c3e50;\n' +
      '  margin-top: 60px;\n' +
      '}\n' +
      '</style>\n'
  ]
}
V3 Source Maps contain a few additional properties that are not present in this example, but we won’t be using those, so I omitted them for the sake of brevity. This is a great article to read if you would like more information on Source Maps.
Working with JavaScript
Since TypeScript is just a superset of JavaScript, it would seem natural that we should get the debugger to work with JavaScript before we move on to TypeScript.
To start, let’s simplify our code a bit and add some event handlers. Copy and paste this code in your App.vue file:
<template>
<div class="container" @click="onClick">
<div class="logo">ckh</div>
</div>
</template>
<script> // <-- Notice that I removed 'lang="ts"' from the opening <script> tag
import { defineComponent } from 'vue';
export default defineComponent({
name: 'App',
methods: {
onClick() {
console.log('Clicked!');
}
}
});
</script>
<style>
/* Some basic styles to center the content */
#app {
display: flex;
justify-content: center;
align-items: center;
width: 100vw;
height: 100vh;
}
.container {
display: flex;
justify-content: center;
align-items: center;
padding: 10px;
background: #063267;
border-radius: 10px;
cursor: pointer;
}
.logo {
display: flex;
justify-content: center;
align-items: center;
font-family: Avenir, Helvetica, Arial, sans-serif;
color: white;
font-size: 48px;
border: 3px white solid;
padding: 0;
line-height: 34px;
padding-left: 2px;
padding-top: 8px;
padding-bottom: 2px;
}
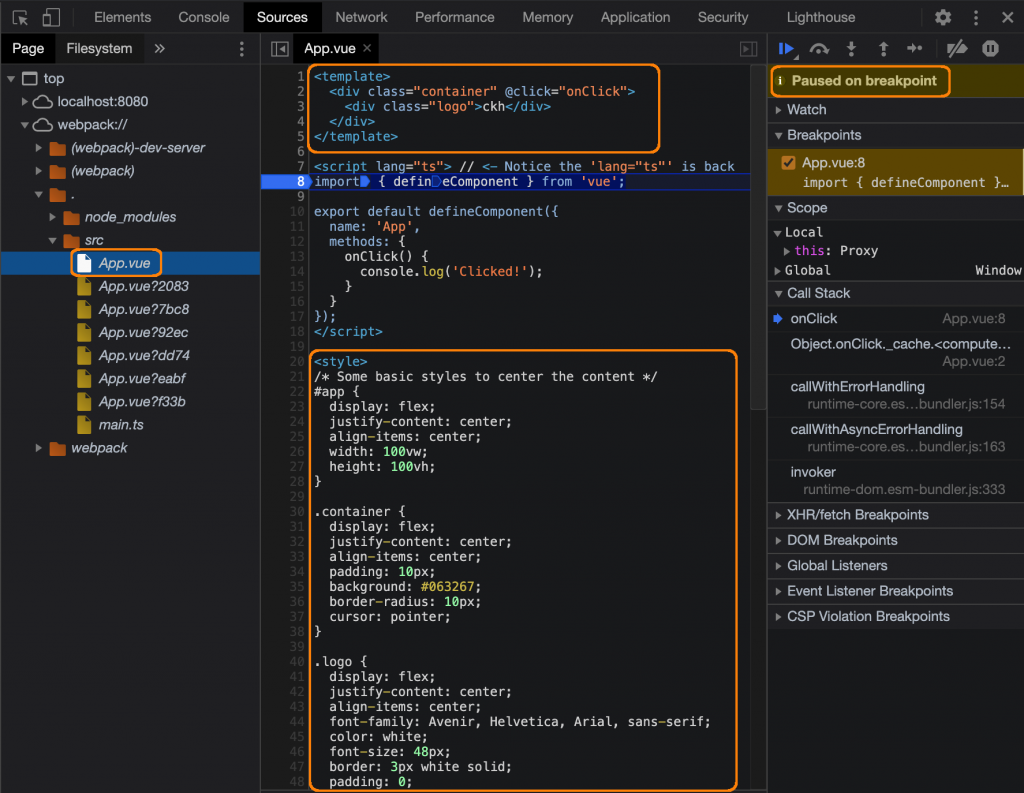
</style>Now restart the app, and open it in Chrome. Open the Sources tab again, and navigate through the webpack:// directory (remember that this will be the name from your package.json file if you’re using Vue CLI v5) again until you find your App.vue file. You should notice that the line numbers next to your new method are highlighted:

If you have experience with using Chrome’s built-in debugging tools, you will know that all of the highlighted lines are lines on which you can place breakpoints. If you place a breakpoint on line #14 (by clicking the line number), then trigger the method by clicking the logo, the code execution should stop on line #14:

Configure VS Code
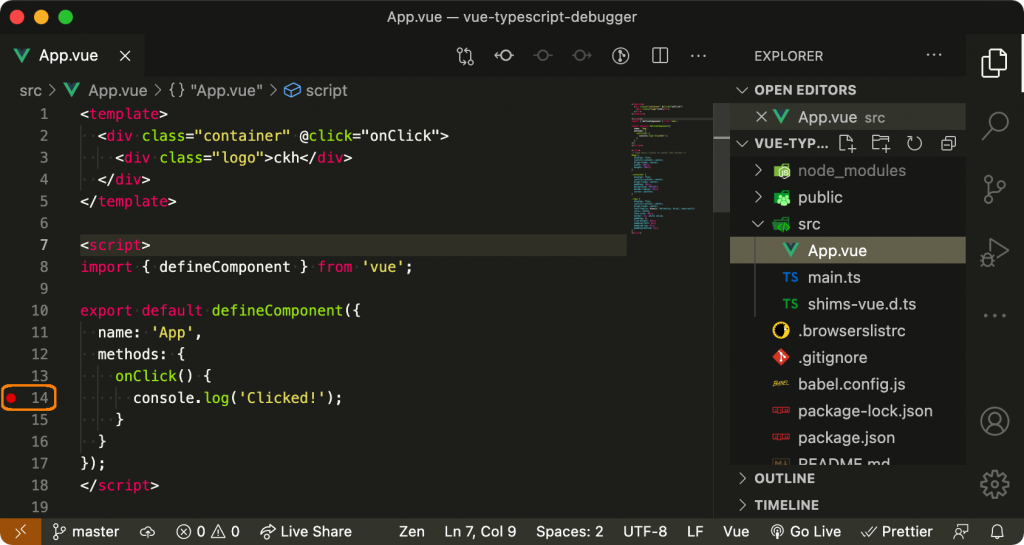
If this was all we could do, it would be a great aid in debugging our applications, but we can do better. The best approach is to be able to set breakpoints directly in your editor, and then have Chrome pause on those breakpoints:
To do this, VS Code must be configured to start an instance of Chrome in debug mode. When Chrome is running in debug mode, VS Code will communicate to it where your breakpoints are. Additionally, whenever Chrome hits a breakpoint, it will communicate that event back to VS Code.
To create a debugger configuration in VS Code, you need a file named launch.json within a folder named .vscode. This folder should reside at the root of your project (again, on the same level as your package.json):

Now paste this configuration into the new launch.json file:
{
  "version": "0.2.0",
  "configurations": [
    {
      "type": "chrome",
      "request": "launch",
      "name": "Vue CLI v4: Chrome",
      "url": "http://localhost:8080",
      "webRoot": "${workspaceFolder}",
      "sourceMapPathOverrides": {
        "webpack:///./src/*": "${webRoot}/src/*"
      },
    }
  ]
}
Notice that the sourceMapPathOverrides property contains the key webpack:///./src/*. You may notice that the directory structure for your Source Maps (within Chrome’s dev tools) looks very similar to this path (webpack:// -> . -> src -> *). That’s because this property is responsible for telling Chrome where to find the original source files that correspond to your Source Maps.
Note: This structure is different (and rather unintuitive I must say) for Vue CLI v5. You might think that the sourceMapPathOverrides value should be “<name-from-package.json>/./src/App.vue”, but that actually isn’t the case.
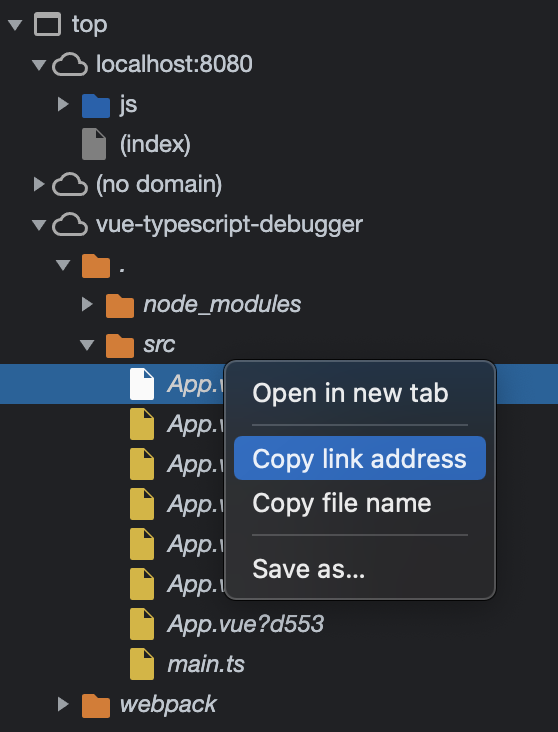
To find out what the value actually should be, right click on one of Source Maps and select “Copy link address” from the context menu. If you paste this value somewhere and inspect it, you may find that it actually comes out to be “webpack://<name-from-package.json>/./src/App.vue”:
Unfortunately, I’m not entirely sure why “webpack://” doesn’t show up in the directory structure of the Chrome Dev tools but it is required in the launch.json configuration:
With that in mind, the sourceMapPathOverrides for the VS Code configuration for Vue CLI 5 should be “webpack://<name-from-package.json>/./src/*”:
{
  "version": "0.2.0",
  "configurations": [
        {
      "type": "chrome",
      "request": "launch",
      "name": "Vue CLI v5: Chrome",
      "url": "http://localhost:8080",
      "webRoot": "${workspaceFolder}",
      "sourceMapPathOverrides": {
        "webpack://<name-from-package.json>/./src/*": "${webRoot}/src/*"
      },
    }
  ]
}
Before VS Code can use this configuration, you must install the debugger plugin that corresponds to the browser you are using. As mentioned previously, I’m using Chrome, but there are plugins available for Firefox and Microsoft Edge as well (Note: the exact configuration within the launch.json file is usually different for each browser, so there is not interoperability between them; You must configure each one individually):

To actually start an instance of Chrome in debug mode, open VS Code’s debug screen, ensure that your new debugger configuration is selected, and press the start button. Note that the app must be running in order for this to work:

The First Breakpoint
Within VS Code, open the App.vue file again, and place a breakpoint on line #14 (you can do this by clicking just to the left of the line number):

Once the breakpoint is set, fire the event handler by clicking on the “container” element. The code execution should stop within your browser, just like it did before, but now you should notice that the code execution has stopped within VS Code as well:

Success!
Switching to Typescript
Switch App.vue back to using TypeScript by adding a lang=”ts” to the opening <script> tag. This will change App.vue back to being a TypeScript Single File Component (SFC):
<script lang="ts">Restart your app, launch Chrome in debug mode again (through VS Code’s debug screen), and navigate to the App.vue Source Map. You will notice now that the line numbers around the onClick method are faded, which means that you cannot set breakpoints on them (go ahead and try, if you’d like):

Browse through the other App.vue files (the ones with letters and numbers at the end); you will notice that one of these files contains the <script> portion from the App.vue Single File Component (the exact name of the file may be different for you). You will also notice that you are able to set breakpoints on the lines that previously allowed them before you changed App.vue back to using TypeScript:

If you set a breakpoint on line #7 and fire the event handler again, you will notice that the code execution actually stops on this breakpoint. Weird! What’s even weirder is that you will notice that VS Code has stopped on a file that isn’t even in your original source code!


From all appearances, it seems that the source-mappings for the <script> portion of App.vue are there as they should be, but they are in the wrong file and are missing the <template> and <style> source code!
Correct the <script> Source Maps
Unfortunately, we’ll have to do a bit of manual Source Map editing, but thankfully, it’s not very complicated!
As I mentioned before, Vue uses Webpack under the hood, and Webpack allows you as the developer to tap into essentially every stage of the build process. We are going to take advantage of this to modify the Source Maps.
To start, add an additional option to your Webpack configuration called plugins. Assign this option to an array, and within that array, add an object that has a function called apply:
module.exports = {
  configureWebpack() {
    return {
      devtool: 'source-map',
      plugins: [{
        apply() {

        }
      }]
    };
  }
};
This function receives the Webpack compiler instance as an argument. We can use this compiler instance to “tap” into (listen for) certain events during the build process.
The event we want to listen for is the thisCompilation event. According to the official Webpack docs, this event is fired during the initialization of the compilation process.
We can tap into this event by calling the tap function and passing in a name (you can specify whatever you want here) and a callback that will receive the compilation instance:
apply(compiler) {
  compiler.hooks.thisCompilation.tap('Initializing Compilation', (compilation) => {

  });
}
We are again able to tap into another step of the build process, but we will use the compilation instance to do this, not the compiler. The event we are tapping into this time is fired after all the modules of the project have been built successfully.
Notice that we are using the tapPromise function this time. This means that this particular event is asynchronous, which is lucky for us since we will need to do some asynchronous work here. The callback for this event receives all of the built modules as its first argument:
compiler.hooks.thisCompilation.tap('Initializing Compilation', (compilation) => {
  compilation.hooks.finishModules.tapPromise('All Modules Built', async (modules) => {

  });
});
Each module holds a reference (as an absolute path) to the resource (i.e. source file, image, etc) that it originated from. We can use this reference to determine which modules we are interested in.
If you haven’t gathered already, the Vue build process will split each Single File Component’s individual parts (i.e. <template>, <script>, and <style>) into separate files.
Here’s an example of what the resource paths look like for our App.vue component:
/Users/sethfearnside/Desktop/vue-typescript-debugger/src/App.vue
/Users/sethfearnside/Desktop/vue-typescript-debugger/src/App.vue?vue&type=script&lang=ts
/Users/sethfearnside/Desktop/vue-typescript-debugger/src/App.vue?vue&type=template&id=7ba5bd90
/Users/sethfearnside/Desktop/vue-typescript-debugger/src/App.vue?vue&type=style&index=0&id=7ba5bd90&lang=css
/Users/sethfearnside/Desktop/vue-typescript-debugger/src/App.vue?vue&type=style&index=0&id=7ba5bd90&lang=css
/Users/sethfearnside/Desktop/vue-typescript-debugger/src/App.vue?vue&type=script&lang=ts
/Users/sethfearnside/Desktop/vue-typescript-debugger/src/App.vue?vue&type=template&id=7ba5bd90
/Users/sethfearnside/Desktop/vue-typescript-debugger/src/App.vue?vue&type=template&id=7ba5bd90
/Users/sethfearnside/Desktop/vue-typescript-debugger/src/App.vue?vue&type=style&index=0&id=7ba5bd90&lang=css
You might think that the plain …/src/App.vue module would contain the Source Map that we are interested in, but that’s not the case; it’s actually one of the script modules.
We can filter those out by checking if the path has a type=script in it, but that still leaves us with 2 duplicate paths:
/Users/sethfearnside/Desktop/vue-typescript-debugger/src/App.vue?vue&type=script&lang=ts
/Users/sethfearnside/Desktop/vue-typescript-debugger/src/App.vue?vue&type=script&lang=ts
Fortunately, each module contains other properties, in addition to the resource path, that we can use to filter the modules down further. The following code segment will properly filter out all the files that we are not interested in. Note that the logic differs slightly between Vue CLI v4 and v5:
compilation.hooks.finishModules.tapPromise('All Modules Built', async (modules) => {
  for (const module of modules) {
    const { resource } = module;

    // If "resource" is not set, ignore this module
    if (!resource) continue;

    // Ignore all modules that originated from the "node_modules" directory
    if (/node_modules/.test(resource)) continue;

    // Ignore all non-Single File Component files
    if (!/\.vue/.test(resource)) continue;

    // If this module is not of the script type, we should ignore it
    if (!/type=script/.test(resource)) continue;

    // Remember that we want to leave JavaScript Single File Components alone
    if (!/lang=ts/.test(resource)) continue;

    // For Vue CLI v4, each module's source map will be held in "module._source._sourceMap".
    // For Vue CLI v5, each module's source map will be held in "module._source._sourceMapAsObject".
    // If this module does not contain a source map, we should ignore it
    if (!module['_source'] || (!module['_source']['_sourceMap'] && !module['_source']['_sourceMapAsObject'])) continue;

    // If we've come this far, this is a module that we are interested in.
  }
});
Now we need some way to acquire the original source code from our source code files. Fortunately, because Webpack is run with Node.js we can use fs (Node.js’s package for accessing the file system) to load the original source code for the script modules.
First we need the path to the original source code files. You may remember that each module holds the path to the file it originated from. We just need to remove the query portion (i.e. “?vue&type=script&lang=ts“) from these paths and they will work perfectly:
const pathWithoutQuery = module.resource.replace(/\?.*$/, '');Next let’s read the file and convert the buffer into a plain string:
// Add this import to the top of the file
const fs = require('fs');

// Note: You may need to use a different encoding (i.e. other than 'utf-8') if you
// use Unicode characters directly in your source code files
const sourceFile = fs.readFileSync(pathWithoutQuery).toString('utf-8');
Now let’s extract the Source Map from the module:
// Remember that the source file is stored in a slightly different place on Vue CLI 5
const sourceMap = module['_source']['_sourceMap'] || module['_source']['_sourceMapAsObject'];
Finally, apply the path and the original source file to the Source Map:
sourceMap.sources = [pathWithoutQuery];
sourceMap.sourcesContent = [sourceFile];
Let’s test things out, and fire up our app again. You will notice that the correct source code is there now! Exciting! The only problem is that it seems that all of the individual mappings are still in their old positions:

The individual mappings were based on the assumption that the source content contained only the <script> portion of our components. Now that it contains the <template> portion, we need to shift each individual mapping down to compensate for that:

The first and most obvious step is to determine which line the opening <script> tag is actually on. Thankfully, this is quite simple since we already have the original source content on hand:
// This regular expression will split the source content into an array,
// where each index holds a single line of the source content
const lines = sourceFile.match(/.+/g);

let indexOfScriptTag = 0;

for (const line of lines) {
  ++indexOfScriptTag;
  // Test the line to see if it has the opening tag
  if (/<script/.test(line)) break;
}
We’re on the home stretch now! Our final task is to apply the offset to each of the individual source mappings. Unfortunately, Node.js does not have a built-in means of modifying Source Maps, so we will have to turn to NPM for that.
You will need to install the (you guessed it!) “source-map” package as a Development dependency:
npm i --save-dev source-mapWe need to import the SourceMapConsumer and the SourceMapGenerator from this package.
The SourceMapConsumer will enable us to consume (i.e. read) the existing mappings, and the SourceMapGenerator will enable us to convert the shifted mappings back to their encoded/compressed format:
// This should be imported somewhere at the top of the file
const { SourceMapConsumer, SourceMapGenerator } = require('source-map');

// This function will create a consumer based on the script’s source map
const shiftedSourceMap = await SourceMapConsumer.with(sourceMap, null, async (consumer) => {
  // This generator will create and hold the offset mappings
  const generator = new SourceMapGenerator();

  // The consumer has the capability to iterate through each individual mapping
  consumer.eachMapping((mapping) => {
    // The “generatedLine” and “generatedColumn” variables refer to a position
    // in the generated (i.e. built) file whereas the “originalLine” and
    // “originalColumn” variables refer to the position of where the given
    // line/column of code came from in the original source file
    const {
      generatedColumn,
      generatedLine,
      originalColumn,
      originalLine
    } = mapping;

    let name = mapping.name;
    let source = pathWithoutQuery;

    // Some mappings won’t have an original position. If this is the case
    // we must make sure to null out the “name” and the “source” attributes
    // otherwise the generator will throw an error
    if (originalLine === null || originalColumn === null) {
      name = null;
      source = null;
    }
    else {
      original = {
        column: originalColumn,
        line: originalLine + indexOfScriptTag,
      };
    }

    // I found it odd that the generator expects the mappings to be in
    // a format that is different to what the consumer provides them as
    generator.addMapping({
      generated: {
        column: generatedColumn,
        line: generatedLine,
      },
      original,
      source,
      name
    });
  });

  // Once all of the mappings have been shifted and added, we need to
  // convert the newly created Source Map to JSON and return it
  return generator.toJSON();
});
Once you’ve assigned the shifted mappings to the script Source Map, everything should be done:
sourceMap.mappings = shiftedSourceMap.mappings;All that’s left is to fire up the app, and test it out (fingers crossed). Don’t forget that you need to start Chrome through the debug screen on VS Code:


Success!!
Closing Remarks
If you would like, you can download this project from GitHub: https://github.com/fearnycompknowhow/vue-typescript-debugger
Be sure to look at the README for some tips on how to setup and run the project.
Thank you very much for following this tutorial; I hope it was of great help to you. Happy coding!


31 Comments
Thank you so much for this! As someone who’s not familiar with webpack, I wouldn’t even know where to start with setting it up. This article explained it really well and when it worked, oh boy what a feeling!
You’re welcome Sean, I’m glad it was of help to you! I spent many hours figuring this out, so I’m very pleased to see that all of that time wasn’t wasted
This is great! One problem I’m seeing is that it does not appear to work with HMR. I can’t quite figure out why that is though.
Hi John, sorry for the late reply. I’ve been out of town for the past two weeks.
I’m not entirely sure why this setup doesn’t work with Hot Module Reloading either. Unfortunately I’ve never done a deep dive into HMR, so I’m not familiar with how it functions.
If you find anything out feel free to let me know. I’ll be sure to leave a comment here if I ever have the time to look into it.
Thank you for this excellent and detailed explanation. I am new to Vue – attempting to make a Vue3 CLI TypeScript app. Following through the steps, when I switch the script to be TypeScript, the article seems to expect that the raw unedited Vue file will be available to the Chrome debugger. For me this doesn’t seem to be the case. In the Chrome debugger Sources tab, via the hierarchy if I open the source file webpack://./src/App.vue, it’s not the raw source but instead is this:
—
import { render } from “./App.vue?vue&type=template&id=7ba5bd90&ts=true”
import script from “./App.vue?vue&type=script&lang=ts”
export * from “./App.vue?vue&type=script&lang=ts”
import “./App.vue?vue&type=style&index=0&id=7ba5bd90&lang=css”
import exportComponent from “C:\\Tom\\src\\ncip\\node_modules\\vue-loader-v16\\dist\\exportHelper.js”
const __exports__ = /*#__PURE__*/exportComponent(script, [[‘render’,render],[‘__file’,”src/App.vue”]])
/* hot reload */
if (module.hot) {
__exports__.__hmrId = “7ba5bd90”
const api = __VUE_HMR_RUNTIME__
module.hot.accept()
if (!api.createRecord(‘7ba5bd90’, __exports__)) {
console.log(‘reload’)
api.reload(‘7ba5bd90’, __exports__)
}
module.hot.accept(“./App.vue?vue&type=template&id=7ba5bd90&ts=true”, () => {
console.log(‘re-render’)
api.rerender(‘7ba5bd90’, render)
})
}
export default __exports__
—
I feel like maybe I’m missing something obvious?
As a test I attempted to disable HMR by adding the following to vue.config.js
—
devServer: {
hot: false,
liveReload: false
}
—
This didn’t seem to have any affect.
Thank you in advance.
Tom V
Hi Tom!
Can you elaborate on how you setup your Vue project. I presume it was through the Vue CLI, but which features did you enable during the setup process?
Also, if possible, can you push your project up to a repository that I can look at?
I think the easiest way for me to diagnose the problem would be if I can look at your current setup, and run it on my local machine to see if I can replicate the issue.
Thanks Tom!
Hi Seth,
Thank you for great post. I’m working on the same issue for a few days.
I think that it’s kind of dependency issue. But, still have no idea which one is the key.
When I create a project with `vue-cli`, it shows weired source map like Tom described before.
But, when I replace the `package-lock.json` file with your sample repo’s one, it shows the original source code as we expected.
My environment is ..
* node : v17.2.0
* npm : 8.1.4
Actually, when I clone your sample repository and delete `package-lock.json`, it shows weired source codes in Chrome devtool. Steps are like below
“`
$ git clone https://github.com/fearnycompknowhow/vue-typescript-debugger.git
$ cd vue-typescript-debugger
$ rm package-lock.json
$ npm install
$ npm run serve
“`
If you have any idea with this, give me a hint with this issue.
Thanks
imb
Hi imb,
It turns out that there are some minor differences when using Vue CLI v5 and v4. I was able to reproduce both your and Tom’s issue when I created a project using Vue CLI v5, so I presume you are also using v5?
My hope is to add support for Vue CLI 5 to this blog post soon. I’ll be sure to leave a comment here when I do.
Hi imb,
I updated the blog to support Vue CLI versions 4.5.x and 5.x.x.
I hope it fixes your problem!
Hi Seth,
Great post, I’m trying to implement this solution with vue-cli v5 but unfortunately, it doesn’t work
some attributes in the module source-map changed _source._sourceMap => _source._sourceMapAsObject but even after replacing the new attribute name
it still broke.
Maybe you give me a hint or try it yourself
Thanks
EranGrin
Hi EranGrin,
Sorry for the vey late reply. After some testing, it turns out that the solution has changed a little bit between Vue CLI 5 and Vue CLI 4.
I was able to get the existing configuration to work without much effort; I’m just trying to find the time to update my blog.
Again, sorry for the delay
Hi EranGrin,
I know it’s been about 2 months now, but I updated the blog to support Vue CLI v5 if you’re interested.
Thanks for letting me know it didn’t work!
Hi Seth,
Good job with you example project.
But I have a problem when I try to reproduce this with my own generated project.
In my webpack src folder every *.vue file is missing the tag section.
With your project, all is fine.
vue –version tells me I am using @vue/cli 4.5.15
Thank you
One sidenote …. if i copy your “package-lock.json” and do a “npm install” – after this all is fine.
Hmm, you’re right. When I flip back and forth between your version (4.5.15) and the version my repo uses (4.5.0) the solution works and then doesn’t work.
I’m aware that the existing solution doesn’t work with Vue CLI v5, but I wasn’t aware the problem seems to have cropped up in one of the bug releases of v4.
I have a working solution for Vue CLI v5, so tomorrow I’ll see if I can create a solution for v4.5.15 and commit it to the repo. I’ll incorporate the changes into the blog shortly after.
Stay tuned!
Hi Christoph,
I’m not sure if you are still interested, but I updated the blog to support all patch versions of Vue CLI version 4.5.x as well as major version 5 of the Vue CLI.
Hope it helps!
Hi! Pretty interesting post and (believe me) the only one in a whole Internet which tries to cover vue-typescript-incorrect-source-map-issue. Thanks for a big job done, but maybe it make sense to create separate package or plugin which is easy to use. Rocket science described in this post is not availabe for such a dummies like me which totally closes all options for debugging with this bloody vue-typescript SFC.
Thank you in advance.
Hahaha! Hi Nick!
I know your frustration. It took many hours of trial and error for me to come to the solution in this blog.
Creating a plugin that is easy to install/use is a pretty good idea. I’ll definitely consider it.
On that note, I wonder if it would be worth it to dig into the Vue CLI repo itself and attempt to fix the problem at its source.
I’ll keep this idea in my mind and certainly mention it in this blog if I ever implement a plugin that you can use.
do you have solution for just vue-loader webpack option (ie without vue-cli) for vue 3?
Hi @Linus,
Unfortunately I’ve never incorporated this functionality into a project that was not made using the Vue CLI. However, I believe the Vue CLI simply uses the vue-loader under the hood, so my hunch is that it should still remain mostly compatible.
Do you have a Github repo that I could take a look at and see what your exact configuration is?
Hi Seth,
Interesting Post and thanks for the detailed explanation.
I’ve struggled to debugging working for a long time without any success. Not much is written about pitfalls with vue 3 debugging flow.
Unfortunately I’m using `script setup lang=’ts’` syntax sugar which is almost making it impossible to debug as it involves Vue 3 setup syntax sugar compiler, which also messes up all the source maps
Please let me know if you find any solution to the debugging problem with script setup syntax
Hi Hari,
I’m familiar with the syntax of which you speak. As a quick test, I switched the “App.vue” component within repo to which I linked in this article to use a setup script tag, and it seemed like everything mostly worked. The only issue I noticed was that the source maps seemed to be shifted down too far.
When I disabled the logic that shifted the line mappings down, everything seemed to work properly. To do this yourself: within the “shiftMappings” function where we shift the line mappings down (“originalLine + indexOfScriptTag”), simply remove the ” + indexOfScriptTag” and see if it starts working for you.
Let me know if this solves your problem. If so I’ll probably file an issue for it in Github.
Thanks a lot!
Hi Seth,
Thanks for the reply.
I’ve ditched webpack for vite and the debugging is working out of the box. Also it’s much faster than webpack.
Thanks again.
It was great! You’ve solved a huge issue. Thanks for explaining the issue and the resolving steps.
All the best to you
I’m glad it helped! Thanks for reading!
Hi Seth,
Thanks for the great article. Though I’m still having issues with `script setup` thing. I have turned off `indexOfScriptingTag` too. However it still hits breakpoints with an offset of several lines. What’s even more strange is that the main vue component (e.g. `Welcome.vue`) is hit correctly, but a nested component `Map.vue` that I’m using inside `Welcome.vue` gets the offset problem. Both of them are using `script setup`.
Any clues?
Hey Shujaat, others have mentioned that they encountered issues when using the setup script syntax. I’ll open an issue on the repo and see if I can make any headway on it when I have some time (hopefully soon).
Woah, thanks a lot for the work!
Sadly I am running into the same ‘setup’ issue. After some tweaking it is working for me.
a) Had to adapt the RegEx, since it was just stepping over empty lines, the calculation of ‘indexOfScriptTag’ was always a little bit higher than the expected value. Am using this one: sourceFile.match(/.+\r\n?|\n/g);
b) this drove me really crazy until I saw the highlights in the developer console where it shows the reachable lines: it looked all the time odd, until I started to add or remove some offset.
Can explain it to me, but
line: indexOfScriptTag + originalLine – 7
does the job for me, even for different source files (some with much, some with less content).
Anyway, thanks for this great entry backing up people with the same issue. Genius 😉
Hi Walter, thanks for the comment. I periodically write new posts, but the next time I get a desire to write a new post, I think I’ll probably update this post instead. Hopefully I’ll be able to resolve the problems that people have encountered around the “setup” syntax
This comprehensive guide on configuring debuggers for Vue + TypeScript provides invaluable insights into a challenging topic. The step-by-step instructions, clear explanations, and code samples make it easier for developers to tackle this issue. Kudos to the author for sharing this helpful resource!
Thanks Luqmaan! I’m glad it was helpful!